Snowflakehas been quickly throughout different organizations and geographies over the past few years. With exponential growth each year when looking at their customer base (~100% growth in 2019 fiscal year) and revenue (257% increase year over year in 2019). There has to be something amazing behind this product besides great marketing right?
With that in mind, I figured it would be a good use of time to take a look. One approach to take when assessing new tools is focusing on a few different use cases and evaluating how it stacks up against the competition. When looking at data and analytics tools, one of the first questions always is “can I get the data were it needs to go quickly?”. In this case, we’ll be looking at loading a basic pipe delimited data set used to populate an old Tableau dashboard from an S3 bucket into Snowflake.
For the purpose of this blog post we’re going to focus on bulk loading. The reason for this being that the most basic use case for many data warehousing initiatives are going to be based on nightly loads or a similar non-continuous schedule. Additionally, we’re going to focus on using an S3 bucket which is external to Snowflake for this attempt.
- External Tables
- Bulk Loading
- Continuous loading
Step 1: What data to load?
In this case, I grabbed the pipe delimited text file and dropped it into an S3 bucket. The the complexity will come in the form of managing my VPC and transferring the data from my S3 bucket to the Snowflake’s internal S3 storage.

File loaded in Snowflake…Note the size of the file in S3.
Step 2: Grant Snowflake Access to S3
Snowflake exists outside of my main AWS account’s VPC so I need to grant my Snowflake account access to my S3 bucket to copy the data into Snowflake. One important thing to note, is that it is definitely a good idea that you have your S3 data in the same region as the Snowflake instance so that you’re data/traffic stays internal to the AWS network (non-public).

Integration flow for S3 Stage.
Per the Snowflake documentation there are three main options for performing this piece of work. The recommended option is to configure a Snowflake Storage Integration so that we can avoid credential requests while trying to get data loaded.
The creation of a policy on my AWS account is the first thing that’s needed.
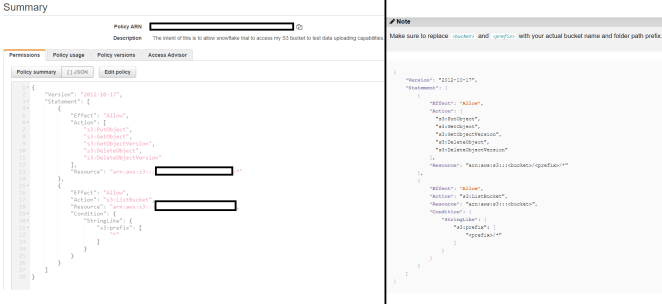
On the left is my policy, on the right Snowflake’s standard recommendation for the policy.
Luckily, the process to do this is straightforward. Snowflake goes as far as providing the exact JSON that needs to be pasted in, so it’s relatively easy. The main exception between what Snowflake recommends and the policy I created is the use of the wildcard “*” in the s3:prefix member. It’s fine for my prototyping use case, but if you have more than 1,000 objects in the bucket, a “*” will cause an error when trying to read/copy data to Snowflake.
The second item that needs to be completed is the configuration of an IAM user which will allow your Snowflake account to access the specified S3 bucket. This is the same process used to allow two separate AWS accounts to access one another’s resources because, well, that’s exactly what’s occurring with Snowflake being hosted on AWS. Detail can be found here, but at the end of the day you’ll end up with an IAM user with the policy we created earlier assigned to the account.
Step 3: Setting up a Snowflake Integration
The creation of the integration is what we were striving for all along. The reason for this is that by creating an integration, we have a way to access our S3 buckets without having to log in or supply credentials in Snowflake. If we don’t create this integration, then each time data is loaded credentials will have to be supplied.
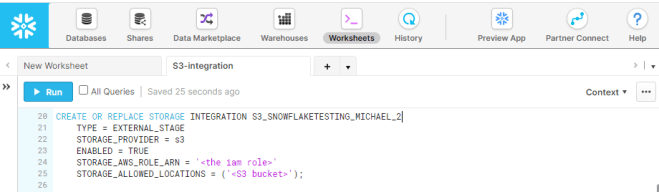
Integration creation which will be used to create Stages.
Step 4: Create the Stage
Finally, we have the ability to connect to our S3 bucket from our Snowflake account. We can now specify the Stage that’s needed in Snowflake to actually load the data from the S3 bucket into our Snowflake. There are many options to customize the stage, but for this basic example I know that I have a text file format with “|” as a delimiter and a header row.
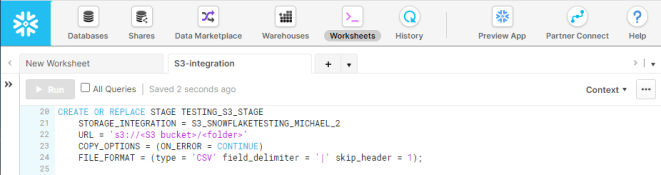
Simple stage creation for loading CSV formatted file.
Step 5: Create the Table
Pretty straightforward. We need somewhere for the data to live once copied into Snowflake from S3. Everyone should be familiar with creating a table using standard SQL. One of the great parts of dealing with Snowflake is the auto-indexing and partitioning right out of the box. So I used the most basic DDL to ensure no data is dropped or skipped in loading due to data type mismatches.

DDL for table creation, based off the structure of the CSV. All String datatypes for ease of loading.
Step 6: Create the Snowpipe
The final step is to get the data loaded from our S3 to Snowflake’s internal S3. This is done through S3, and involves the final step of creating the Snowpipe for loading the data.
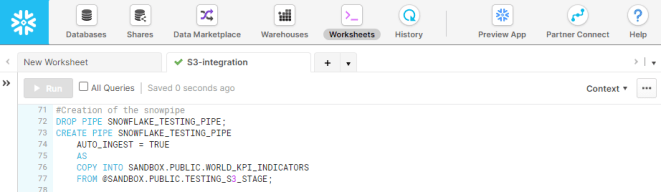
Creating a Snowpipe that automatically loads the data upon creation.
Final Outcome:
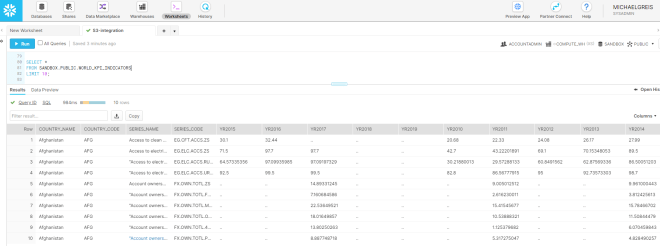
Our data has landed!
As we see when running a query against our table, the data is now present in Snowflake and available for querying. Additionally, the file that was loaded into Snowflake still exists in our S3 bucket for use in any QA or validation that we want to perform. In our final state, we can also see that Snowflake automatically compressed our data from over 50MB to 15.49MB without any manual intervention.
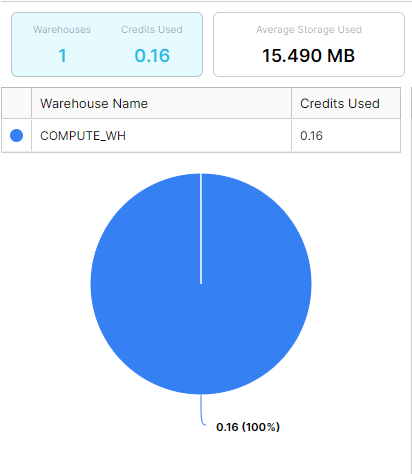
With automatic compression, the file now takes about ~30% of the storage space that the raw file does on S3.
Going forward, we’ll be exploring some more interesting/impressive capabilities of Snowflake. But starting here, you can see the ease of use, going from no infrastructure to having data feeding into a enterprise scalable data warehouse in less than a couple hours.