Building a Serverless Data Ingestion – Architecture

Data and analytics always seems to start with the same problem. How do get the data where it’s needed so that we can start getting insights? The problem isn’t getting the data from point A to B, but doing this in a way that is easy, cost-effective, reliable, and appropriately scalable for the use case. With the rise of the different cloud providers and their toolsets, I thought it would be fun to give a swing at implementing a serverless, JSON based approach using AWS.

This will be series of articles which will be broken down into the following:

  • Architecture: What’s the approach?
  • Development Process: How did I set up my environment that was effective and efficient for developing?
  • Difficulties: What issues came up, and how did they get resolved?
  • End results: Does this architecture achieve the goals that it set out to achieve?

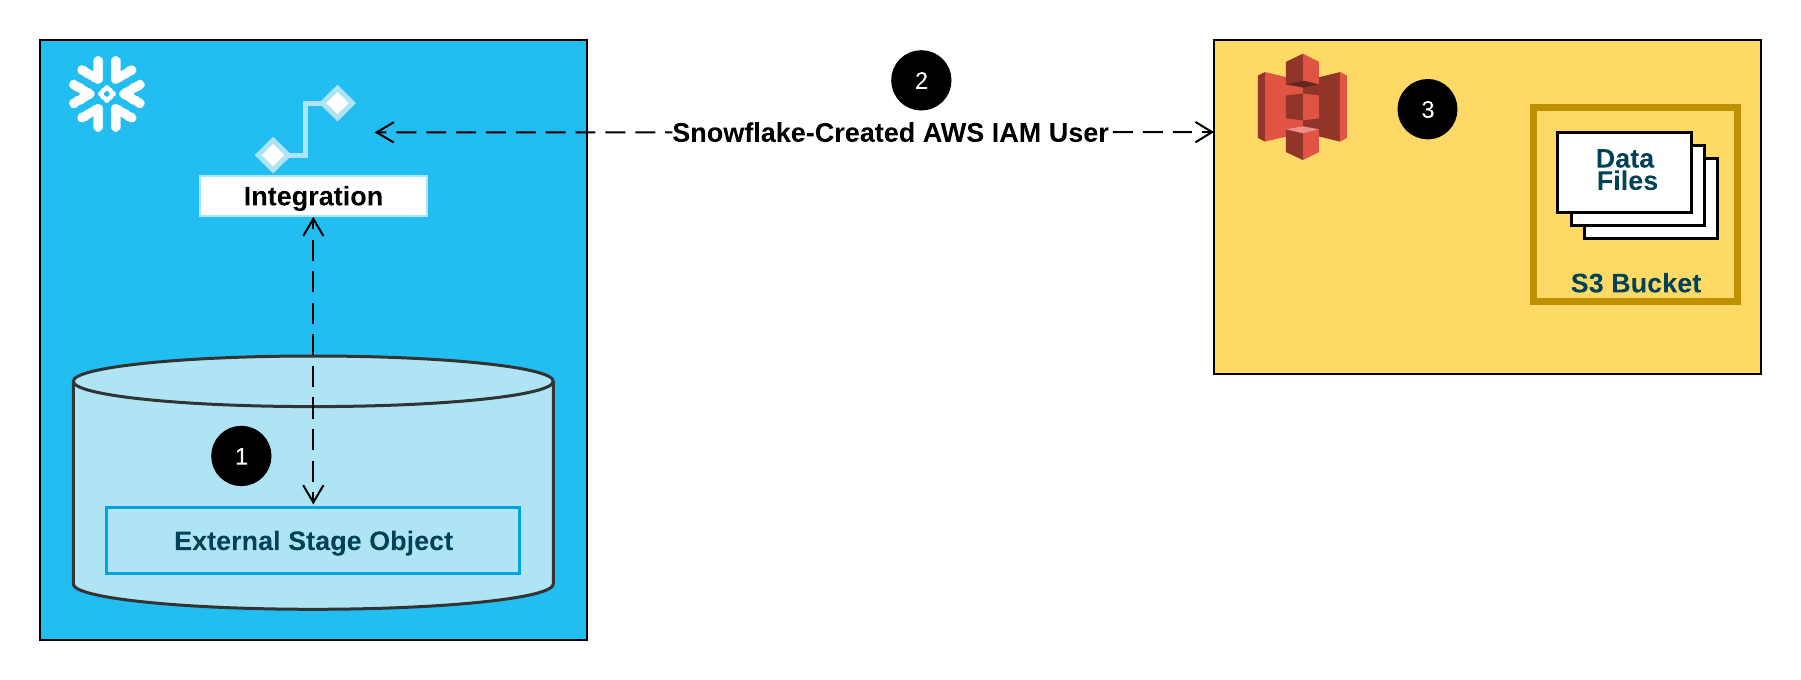
Diving into the architecture plan is outlined below. We’ll go into each of the boxes in detail, but first let’s frame the use case for this project:

I want a solution that can be used in my personal data projects, can scale up to N data ingestion pipelines as needed, and is cheap to operate.

With that goal in mind, the solution uses technologies that support these objectives:

  1. Scalability: All of these technologies can scale from gigabytes to terabytes of data automatically, being fully managed services. Additionally, the Lambda python functions that have been written are entirely serverless.
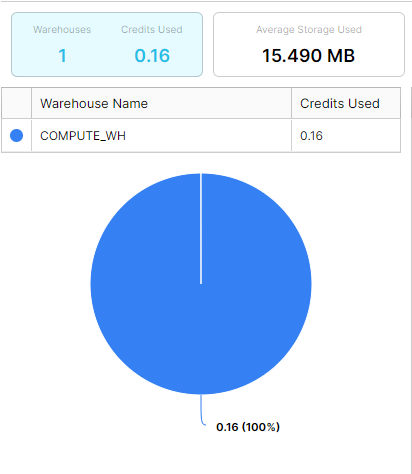
  2. Cost: Cost is all based upon usage. So if nothing is used, all I’m paying for is storage costs for the storage of persistent data. DynamoDB’s on-demand capacity based pricing charges $.25 per a Gb, so using this service as a landing location before moving into Snowflake is extremely affordable considering the budget.
  3. Upkeep/maintenance: Everything but the data layer is server-less, so no EC2 to keep up. No patching or server status’ needing to monitored. Or the worst case, no script kitties entering into an unprotected servers in my VPC that require me to start over from scratch.

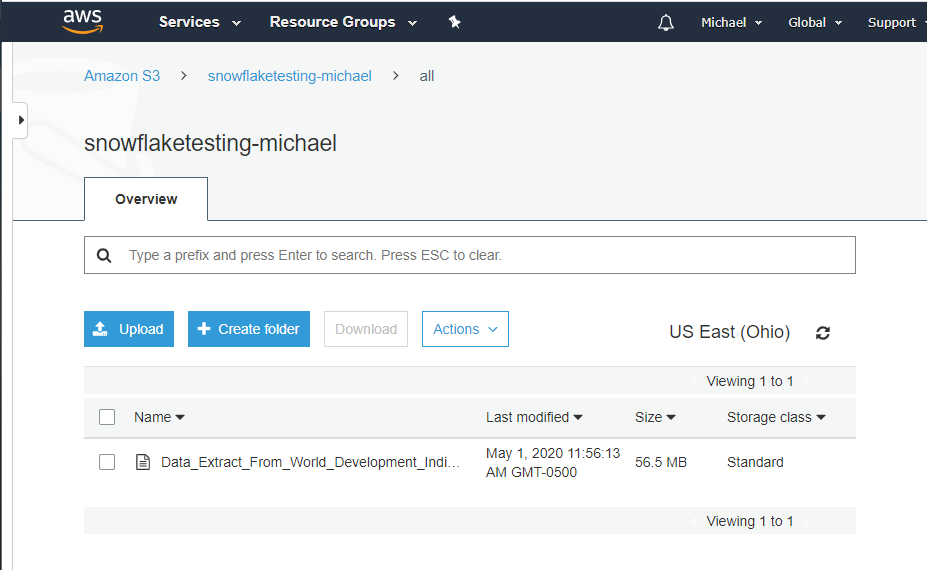
So pretty straightforward from an overall technology standpoint right? The other item to note is how the Lambda functions are written in the python. The idea behind the S3 bucket structure is to funnel all of the data for ingestion into a single location, and ensure that the data is in a similar format to be landed in Dynamo DB.

With the Lambda functions in the GitHub repo here, we ensure that there is a key present that uniquely identifies the exact upload record and it’s origination so I can reuse the upload process for as many different feeds as we want, from whatever buckets we want. Completely configurable to point to a bucket you own, or someone else’s bucket, you can and land it in your own bucket.

Here’s one of the functions demonstrating a super straight forward movement/copy function to get our data to a single ingestion bucket:

# Read data file from S3 location
# Unpack/Unzip into JSON
# Load to landing bucket location
 def copy_object(self,source_bucket,object_key,target_bucket):
   target_object = object_key + str(time.time())
   copy_source = {
    'Bucket' : source_bucket,
    'Key' : object_key
   }
   s3 = boto3.resource('s3')
   landing_bucket = s3.Bucket(target_bucket)
   try:
    landing_bucket.copy(copy_source, target_object)
   except Exception as ex:
    print(ex)
   else:
    print('Success! Object loaded to: ' + target_object)
    return (target_object)

After this, it’s a matter of moving the data along the layers with our Lambda functions, manipulating the data as necessary, and ending up with that data inside of DynamoDB. The idea here being, if we build out the required functions in Lambda, these core python classes used in the Lambda functions to load the data for as many sources as we want, as long as they are similar.

As an example, do you have customer data being sent from many different sources, slightly differently? Well we can get that data into a single DynamoDB table to load into our relational Snowflake database for analytics, or access the data directly using DynamoDB’s API. All of the data in this example is landed in a single table, and can be identified by source for individual processing/analytics.

Although this all sounds straightforward, developing this architecture was truly easier than other side projects/tinkering I’ve done due to the tools that are available to develop Lambda functions and interact with AWS infrastructure. In the next section I’ll talk about the tools I used, how code was deployed, and few other relevant items that made all of this easier to do than expected.

Getting Started – Snowflake and S3

Snowflakehas been quickly throughout different organizations and geographies over the past few years. With exponential growth each year when looking at their customer base (~100% growth in 2019 fiscal year) and revenue (257% increase year over year in 2019). There has to be something amazing behind this product besides great marketing right?

With that in mind, I figured it would be a good use of time to take a look. One approach to take when assessing new tools is focusing on a few different use cases and evaluating how it stacks up against the competition. When looking at data and analytics tools, one of the first questions always is “can I get the data were it needs to go quickly?”. In this case, we’ll be looking at loading a basic pipe delimited data set used to populate an old Tableau dashboard from an S3 bucket into Snowflake.

For the purpose of this blog post we’re going to focus on bulk loading. The reason for this being that the most basic use case for many data warehousing initiatives are going to be based on nightly loads or a similar non-continuous schedule. Additionally, we’re going to focus on using an S3 bucket which is external to Snowflake for this attempt.

  1. External Tables
  2. Bulk Loading
  3. Continuous loading

Step 1: What data to load?

In this case, I grabbed the pipe delimited text file and dropped it into an S3 bucket. The the complexity will come in the form of managing my VPC and transferring the data from my S3 bucket to the Snowflake’s internal S3 storage.

AWS Data

File loaded in Snowflake…Note the size of the file in S3.

Step 2: Grant Snowflake Access to S3

Snowflake exists outside of my main AWS account’s VPC so I need to grant my Snowflake account access to my S3 bucket to copy the data into Snowflake. One important thing to note, is that it is definitely a good idea that you have your S3 data in the same region as the Snowflake instance so that you’re data/traffic stays internal to the AWS network (non-public).

storage-integration-s3

Integration flow for S3 Stage.

Per the Snowflake documentation there are three main options for performing this piece of work. The recommended option is to configure a Snowflake Storage Integration so that we can avoid credential requests while trying to get data loaded.

The creation of a policy on my AWS account is the first thing that’s needed.

S3 Policy

On the left is my policy, on the right Snowflake’s standard recommendation for the policy.


Luckily, the process to do this is straightforward. Snowflake goes as far as providing the exact JSON that needs to be pasted in, so it’s relatively easy. The main exception between what Snowflake recommends and the policy I created is the use of the wildcard “*” in the s3:prefix member. It’s fine for my prototyping use case, but if you have more than 1,000 objects in the bucket, a “*” will cause an error when trying to read/copy data to Snowflake.

The second item that needs to be completed is the configuration of an IAM user which will allow your Snowflake account to access the specified S3 bucket. This is the same process used to allow two separate AWS accounts to access one another’s resources because, well, that’s exactly what’s occurring with Snowflake being hosted on AWS. Detail can be found here, but at the end of the day you’ll end up with an IAM user with the policy we created earlier assigned to the account.

Step 3: Setting up a Snowflake Integration

The creation of the integration is what we were striving for all along. The reason for this is that by creating an integration, we have a way to access our S3 buckets without having to log in or supply credentials in Snowflake. If we don’t create this integration, then each time data is loaded credentials will have to be supplied.

Snowflake Integration

Integration creation which will be used to create Stages.

Step 4: Create the Stage

Finally, we have the ability to connect to our S3 bucket from our Snowflake account. We can now specify the Stage that’s needed in Snowflake to actually load the data from the S3 bucket into our Snowflake. There are many options to customize the stage, but for this basic example I know that I have a text file format with “|” as a delimiter and a header row.

Snowflake Stage Creation

Simple stage creation for loading CSV formatted file.

Step 5: Create the Table

Pretty straightforward. We need somewhere for the data to live once copied into Snowflake from S3. Everyone should be familiar with creating a table using standard SQL. One of the great parts of dealing with Snowflake is the auto-indexing and partitioning right out of the box. So I used the most basic DDL to ensure no data is dropped or skipped in loading due to data type mismatches.

Snowflake Create Table

DDL for table creation, based off the structure of the CSV. All String datatypes for ease of loading.

Step 6: Create the Snowpipe

The final step is to get the data loaded from our S3 to Snowflake’s internal S3. This is done through S3, and involves the final step of creating the Snowpipe for loading the data.

Snowpipe Creation

Creating a Snowpipe that automatically loads the data upon creation.

Final Outcome:

Query Output

Our data has landed!

As we see when running a query against our table, the data is now present in Snowflake and available for querying. Additionally, the file that was loaded into Snowflake still exists in our S3 bucket for use in any QA or validation that we want to perform. In our final state, we can also see that Snowflake automatically compressed our data from over 50MB to 15.49MB without any manual intervention.

Snowflake Storage Volume

With automatic compression, the file now takes about ~30% of the storage space that the raw file does on S3.

Going forward, we’ll be exploring some more interesting/impressive capabilities of Snowflake. But starting here, you can see the ease of use, going from no infrastructure to having data feeding into a enterprise scalable data warehouse in less than a couple hours.